Instructions for creating a To-Do application in Go using the Gin Framework

In this tutorial blog, I will be delivering an idea regarding the creation of the Todo Application in Golang. This blog is going to be beginner friendly, but there are a few prerequisites that you need to be prepared with so that you can grab the concept mentioned in this tutorial easily. The outcome of this project will include an app from which the client can Create, Fetch, Update, and Delete a to-do task. This blog will change your perception as well and clear your query in Golang Web Development.
Prerequisites
This section will describe the requirements before proceeding toward the learning section of this tutorial blog. You should familiarise yourself with the fundamentals of the Go programming language, such as functions, parameters, arguments, and structures. Along with knowing the fundamentals of Golang, you should be familiar with RestAPI and What is API. Next, rather than utilizing the renderer to test my APIs, I'll use the Postman Application therefore you need to download the application. I'll be utilizing MongoDB as my database for this project and linking it to my to-do application. Last but not the least, on your computer, Go Program should be installed.
Project Directory for the Code
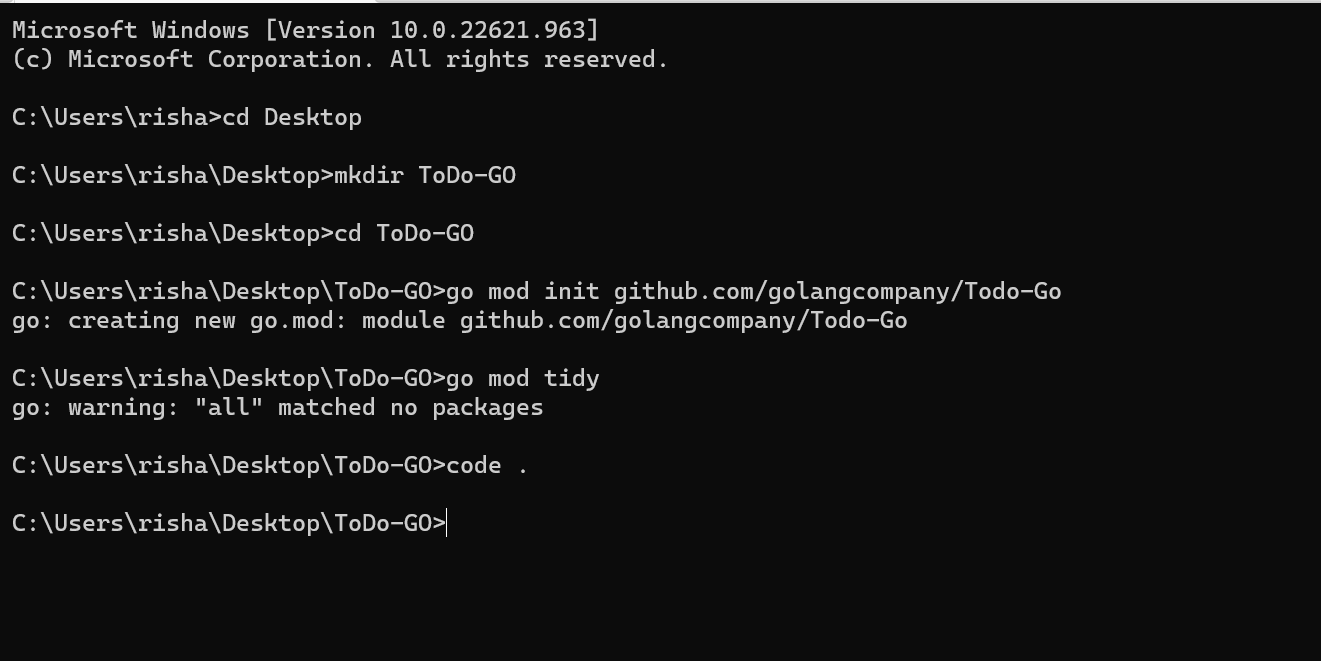
Here, the initial step for the project is to create a directory. Therefore, to create your directory, first, open a command prompt, then write "cd D" and hit the Tab key on your keyboard to complete your line of command, resulting in "cd Desktop". Then you need to input “mkdir ToDo-Go”. After that, you must import the mod file into your main directory by entering "go mod init github.com/golangcompany/ToDo-Go" on the command line.
[Image 1]
Building Struct
Let me first give you an explanation of what a struct is if you don't already know. A structure or struct is essentially a grouping of various fields. For instance, if you want the client to enter various data sets and types, you'll need to define variables for that. However, with Go, you can specify and use your type. Struct operates in this manner. I have listed the fields ID, Title, Completed, and CreatedAt in the struct for my to-do application.
I have listed the kinds for each field, i.e., I have listed the Datatype as String for Title and Completed and the Time for CreatedAt. When including the date or time in your program, you must import Time, another internal Go package. Please refer to image 2 for better clarification.

[Image 2]
Entry Point for the Program
I haven’t started with the main.go file since preparing struct before proceeding for something else since sometimes it’s comfortable and struct is the easiest part from where you can begin your code. In this section, I will be explaining the code of the main.go file.
[Image 3]
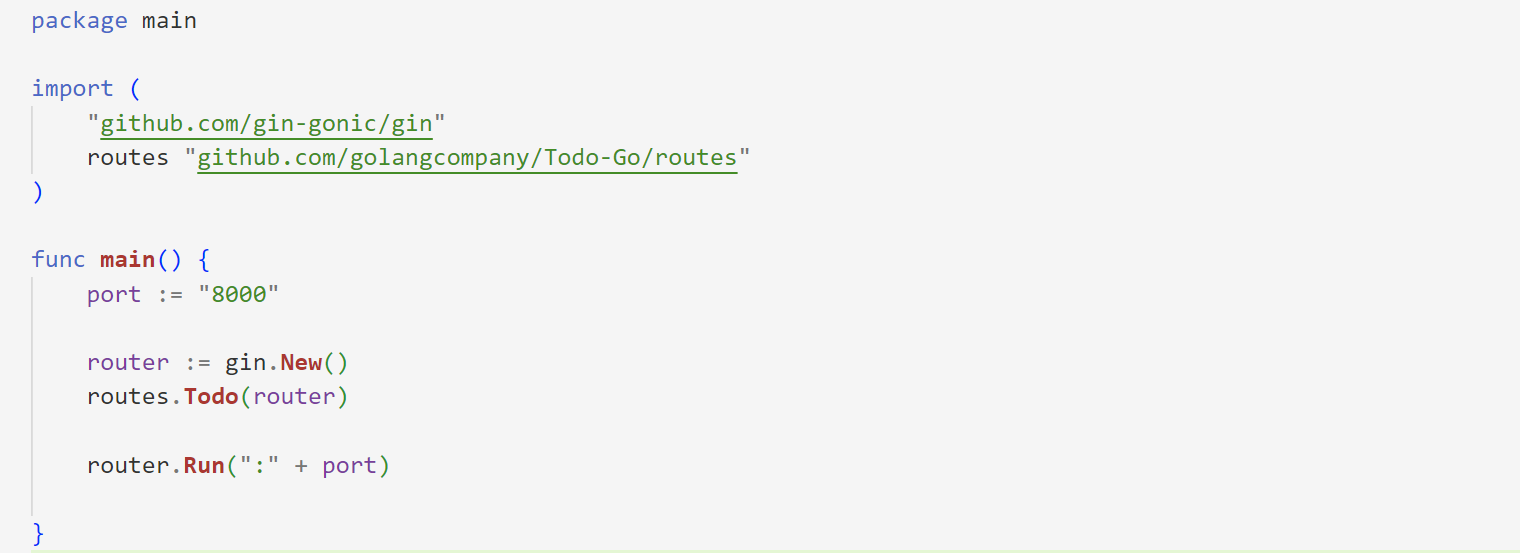
Here, I have imported the Gin and routes packages into my main.go file. And then I explained my main function, where I directly defined the port and indicated a variable called a router that had gin and asked it to produce a new, empty instance of Engine without any middleware attached.
I invoked the Todo function from the routes package, handed it the router argument, and told it to start the server. As an argument, it accepts a port number and listens on that port. The next step would be to proceed with the routes package but before that, you need to understand the structure of the directory in which you will store your project or in simple words, the structure of your project. To get a better understanding, please refer below,
- Main Directory
main.go (File)
go.mod (File)
go.sum (File)
- controller (Folder)
–controller.go (File)
- database (Folder)
–databaseSetup.go (File)
- models (Folder)
–usermodels.go (File)
- routes (Folder)
–routes.go (File)
Setting Up the Routes
In this section, I will be mentioning the routes. You need to import a few packages before proceeding i.e., “github.com/gin-gonic/gin” and the controllers package. Then after importing the packages. I have created a function todo, this function takes in type *gin.Engine and returns nothing. The main intention of setting up the routes in this function is to create APIs for GET, POST, PUT, and DELETE. The image mentioned below i.e., image 4 will give you a clear picture of the concept.

[Image 4]
Database & Controller Setup
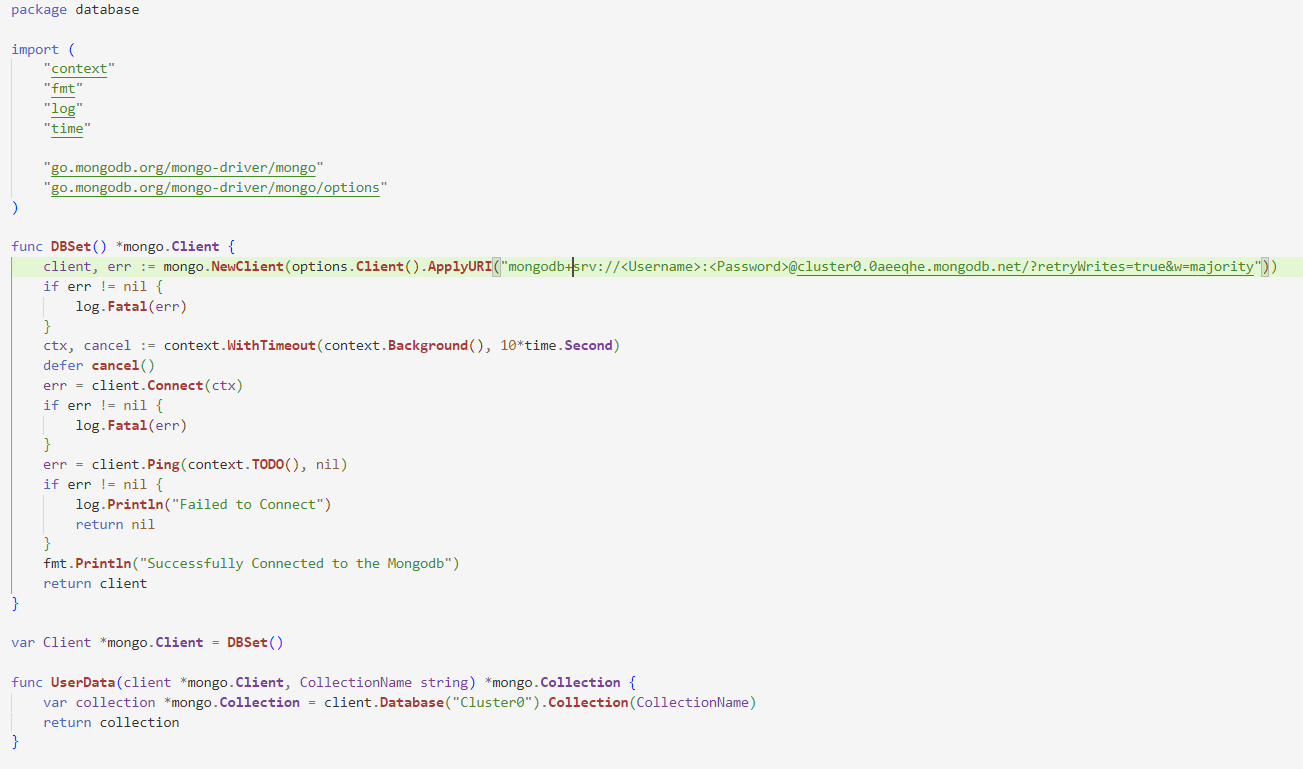
I'll walk you through connecting your application to the MongoDB database in this part. To start running the code, I first imported the mongo driver package. Then I developed the DBSet function. I alluded to the URI in the first step that contains the MongoDB String. Following that, I used "defer" to halt the execution if the program couldn't establish a connection after mentioning the timeout of 10 seconds. Then I declared the UserData function, which retrieves a collection from the database. The client and the collection's name are the two arguments it requires. This is how you can set the Database Connection in Golang. I am using MongoDB as my database, you can proceed with SQL as well. To know more about this you can visit one of my tutorial blogs to understand it in depth. Image 5 will give you more clarity on the above explanation.
[Image 5]
Now let me give you an explanation of controllers as well. Please refer to image 5 before proceeding. In that Image, you will be able to see the imports and I have also declared a variable TodoCollection of type mongo.Collection.

[Image 6]
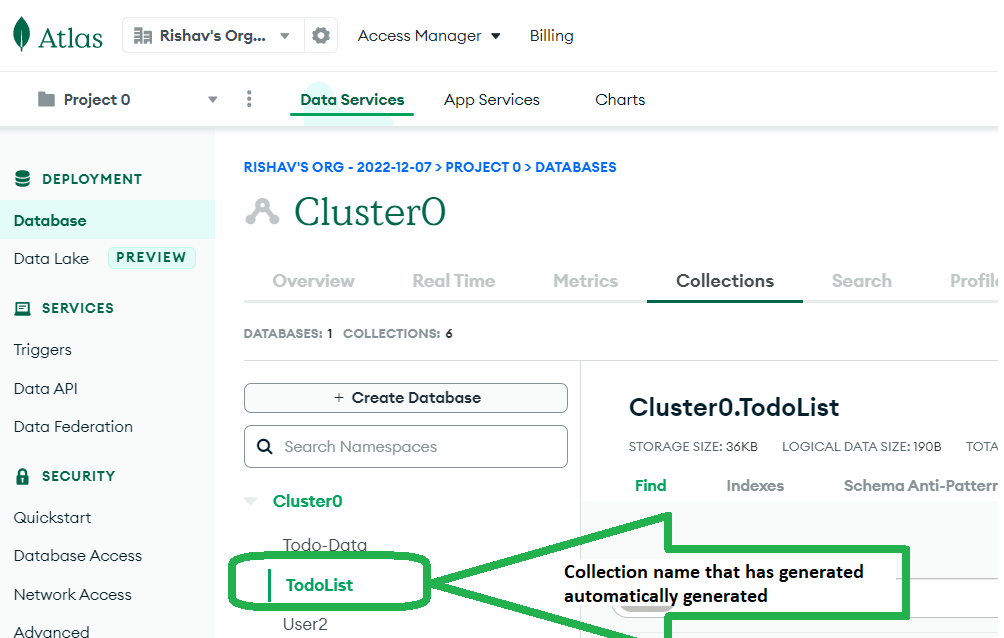
In Image 7 you can see that the collection name in my database is automatically set to TodoList. Then I'll start developing our first controller method, FetchTodo, which will retrieve the Todo from our database using its ID. Everything in the CreateTodo function stays the same up until the context, but since my goal is to create new todos using this function, I've used a primitive that will produce distinct object ids for my todos whenever the client generates them. I'm going to my UpdateTodo function and DeteleTodo function right away. Similar to CreateTodo, the DeleteTodo function simply removes a task from the database. It accepts an id and deletes the task associated with it. UpdateTodo function that modifies a to-do item's title and finished fields. Please refer to images 8, 9, 10, and 11.
[Image 7]
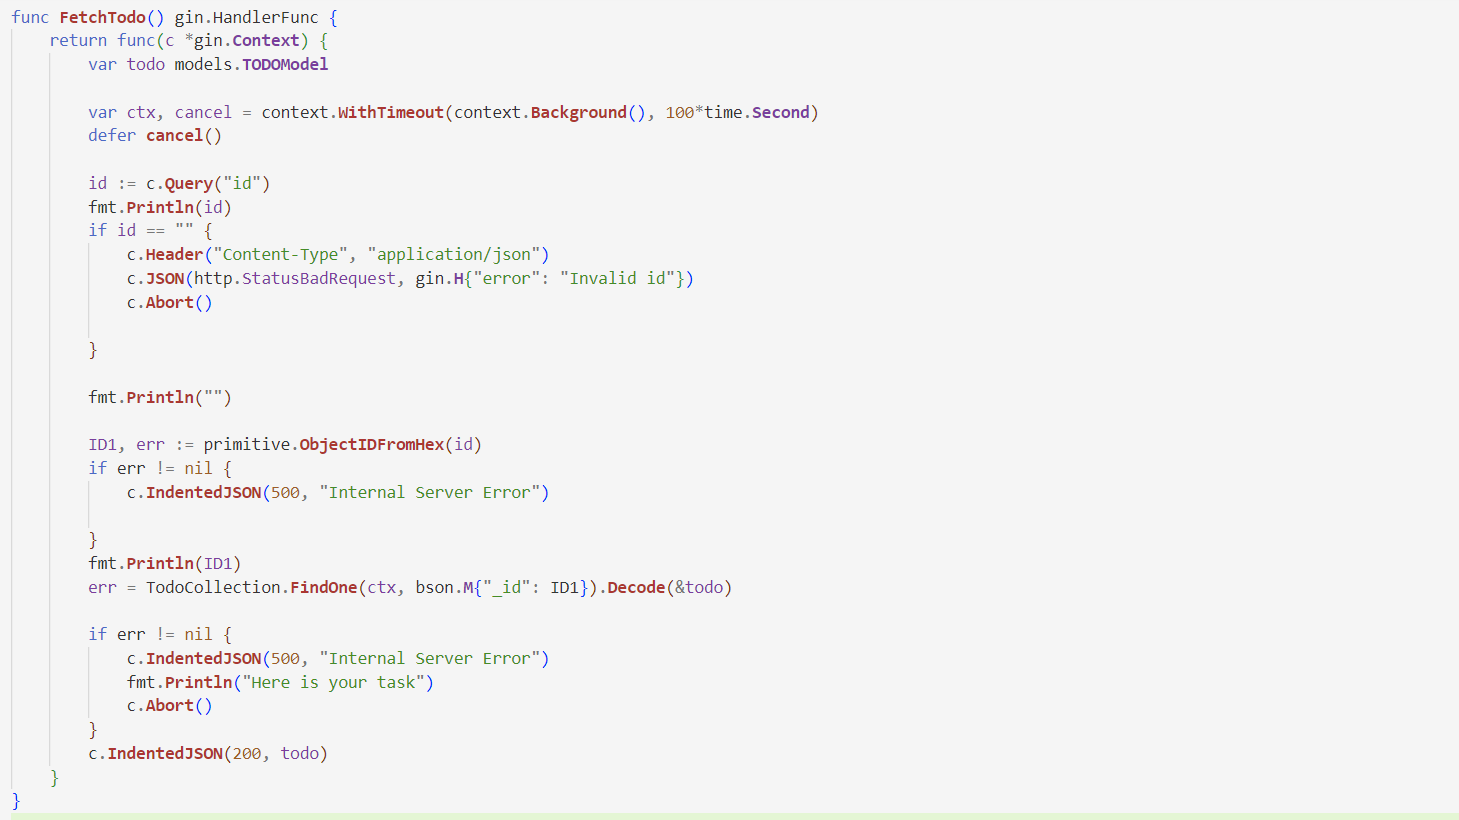
[Image 8]
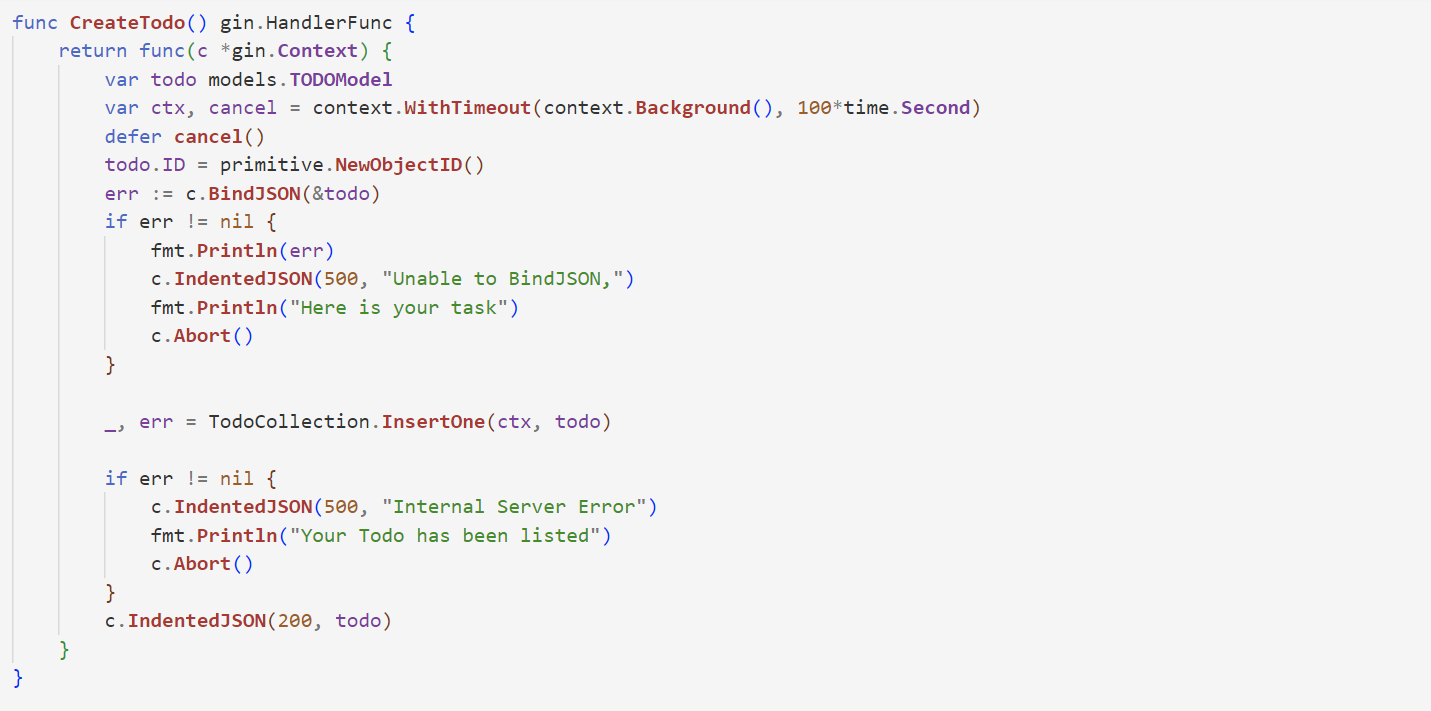
[Image 9]
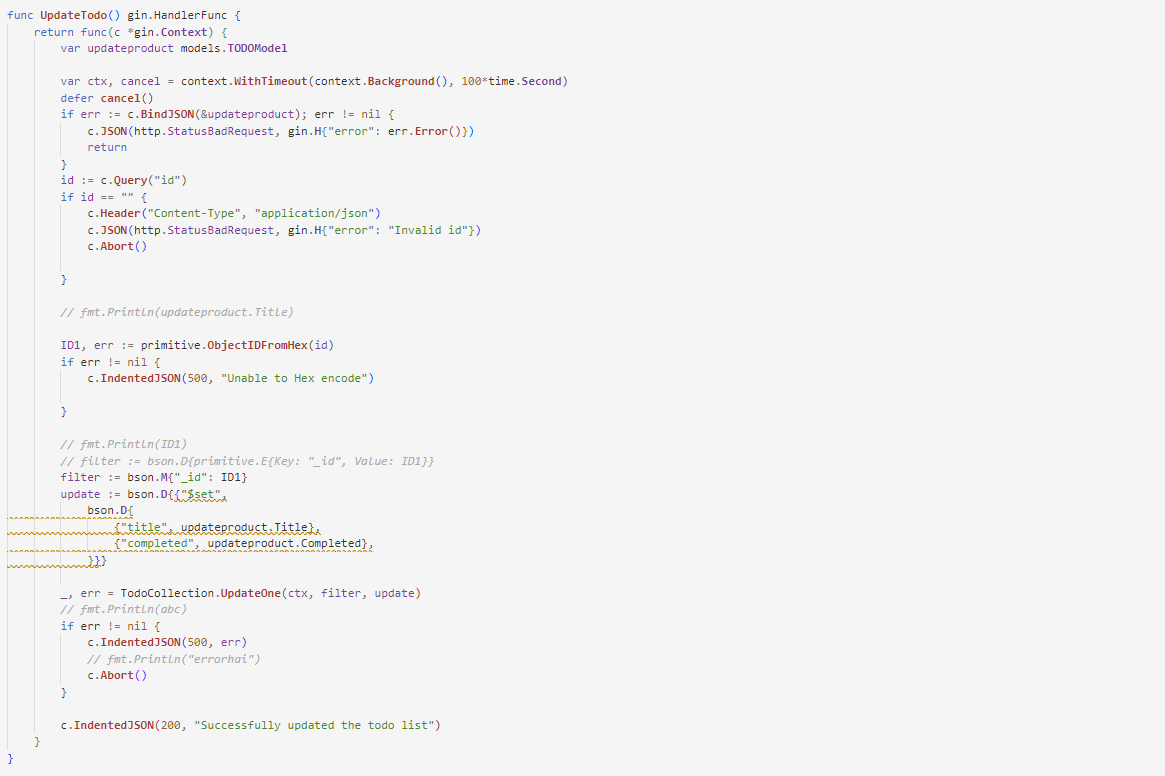
[Image 10]
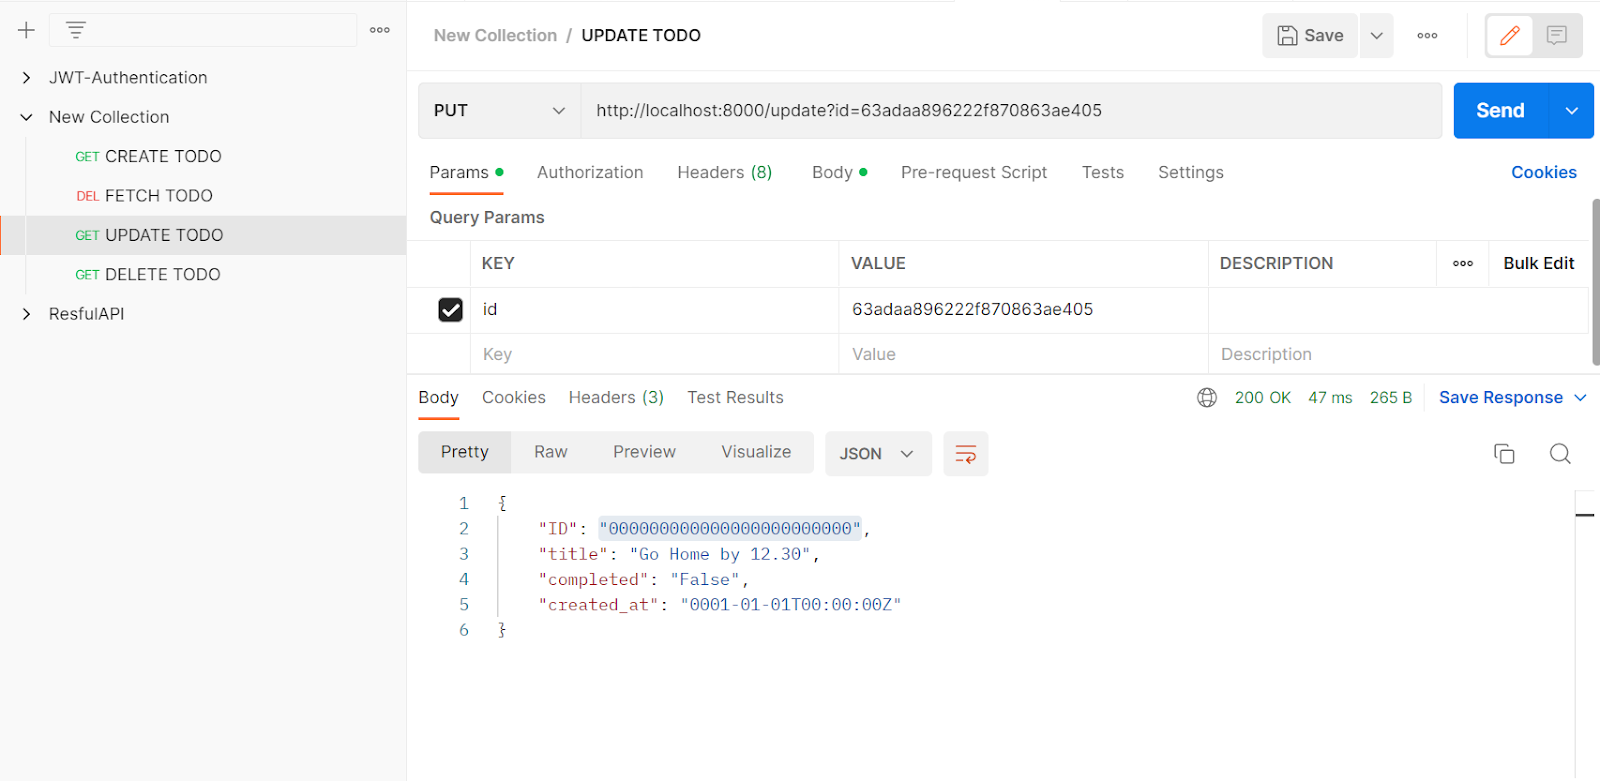
After working on controllers, you need to check your application with the help of the Postman Application. You can use Thunder Client as well which is a Visual Studio Code Extension, but I prefer postman to check my APIs. I will paste the images of my testing which will give you a clear picture of the concept.
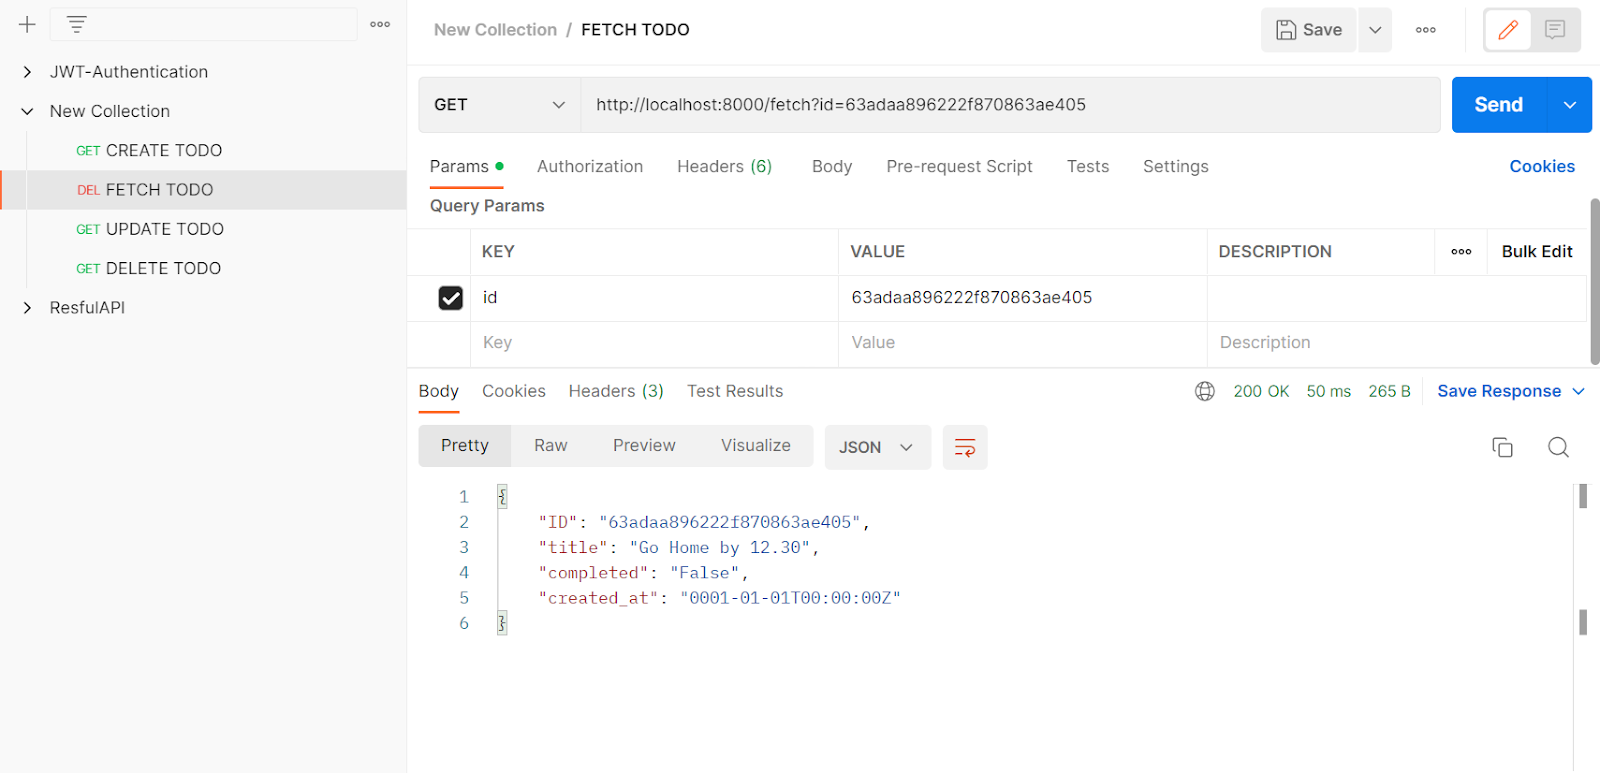
[Image 13]
[Image 14]

Rishav’s professional life began in 2019 when he completed his B. Tech in computer science and engineering. He has been in content development for the last 2.5 years. Tech is not his profession, it’s his curiosity that he believes to explore as much as he can.